

Desktop vs Mobile Dimensions
Overview
Global-e Site Customization screens may render differently on Desktop and Mobile devices. This section describes the Desktop versus Mobile differences for each of the four customizable screen types (Welcome Pop-Up, Country Switcher, Marketing Banner, and Checkout) including recommended dimensions, customization scope, and any mobile-specific behavior. All four screen types support 27 languages. Edits made to one language do not update the others. For consistency, apply translated changes manually across all language versions. Deliver your mock-up in one of the following formats:- PSD
- XD
- Online design (e.g., Zeplin)
- Image (PNG or JPEG recommended; other formats supported)
Tier Availability
The Desktop versus Mobile distinction applies across all merchant tiers (Enterprise, Pro, and NCE). However, which screen types a merchant can edit depends on their tier:| Screen Type | Enterprise | Pro | NCE |
|---|---|---|---|
| Welcome Pop-Up | ✓ | ✓ | ✗ |
| Country Switcher | ✓ | ✓ | ✗ |
| Marketing Banner | ✓ | ✓ | ✓ |
| Checkout | ✓ | ✓ | ✗ |
Shipping Banner
Rendering Across Devices
The Shipping Banner renders identically on Desktop and Mobile. There is no separate Desktop or Mobile variant-the banner uses a fluid container that spans the full width of its parent element on every device. The same configuration (background color, height, font, and text color) applies to all viewports.Customization Scope
The following tables shows the customization scope:| Element | What is Customizable |
|---|---|
| Background color | Color of the banner background |
| Banner height | Specified in pixels by the merchant |
| Font | Font family for the banner text |
| Text color | Color of the banner text |
Styling Precedence Note
Styling Precedence Note
If the container hosting the banner on the merchant’s site includes its own CSS properties, the styling configured via the Site Customization editor may not take effect. In such cases, the merchant must adjust their container CSS to allow the banner styling to apply. The following tables shows the recommended dimensions:| Aspect | Value |
|---|---|
| Width | 100% of the container (fluid; not configurable) |
| Height | Configurable in pixels by the merchant; no recommended fixed value |
Accessing the Customisation Page
To customize your page configurations, you must access the Customization page.-
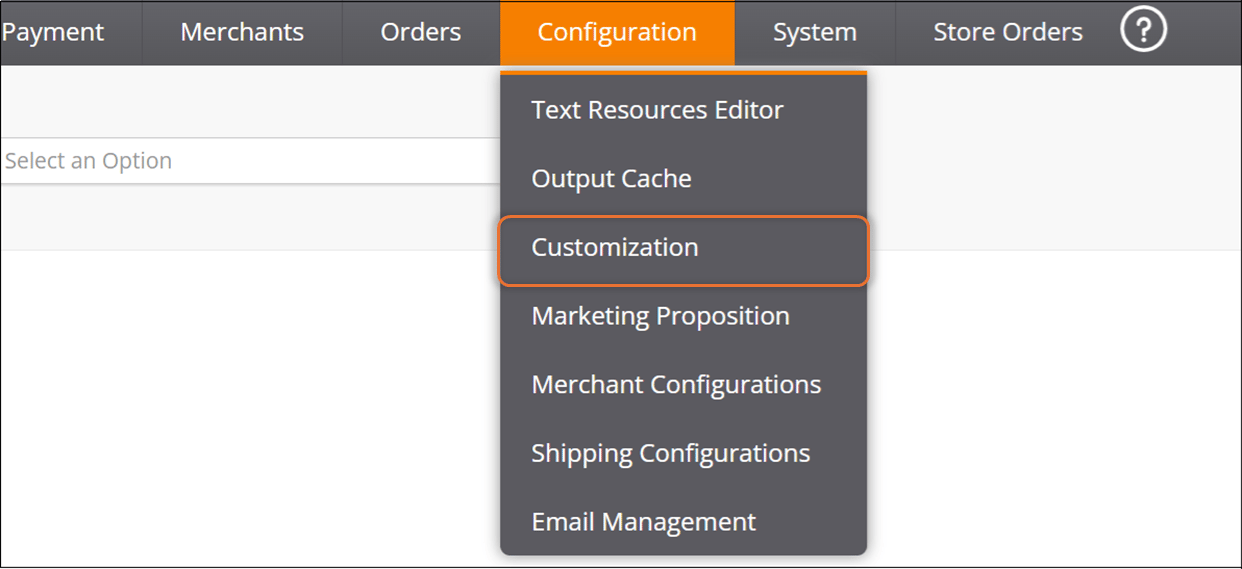
Navigate to Configuration > Customization from the top menu:
-
Select a merchant from the Merchant menu.
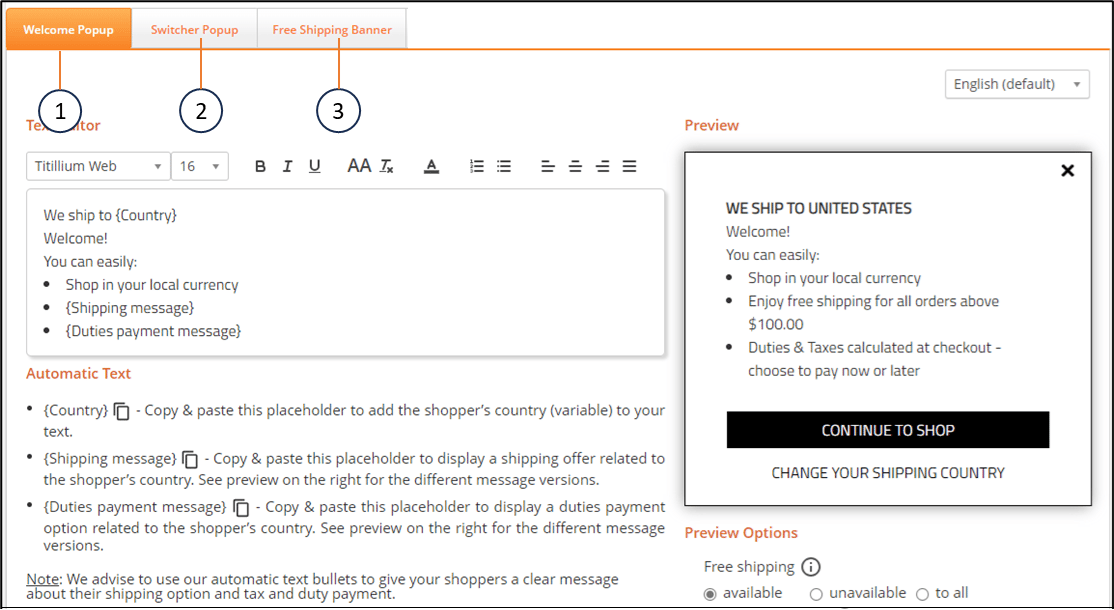
The following page is displayed.
-
Configure the elements above according to the table below:
No. Element Description 1 Welcome Popup tab View, modify, and manage elements related to your Welcome popup screen. 2 Switcher Popup tab View, modify, and manage elements related to your Switcher Popup screen. 3 Free Shipping Banner tab View and modify your shipping banner page configuration.
Configuring Your Shipping Banner Page
From here you can view and modify your shipping banner page configuration. A live preview of your configurations is displayed on the right side of the page. Note that you can reset your settings to their default configurations by clicking Reset to default at the bottom of the page.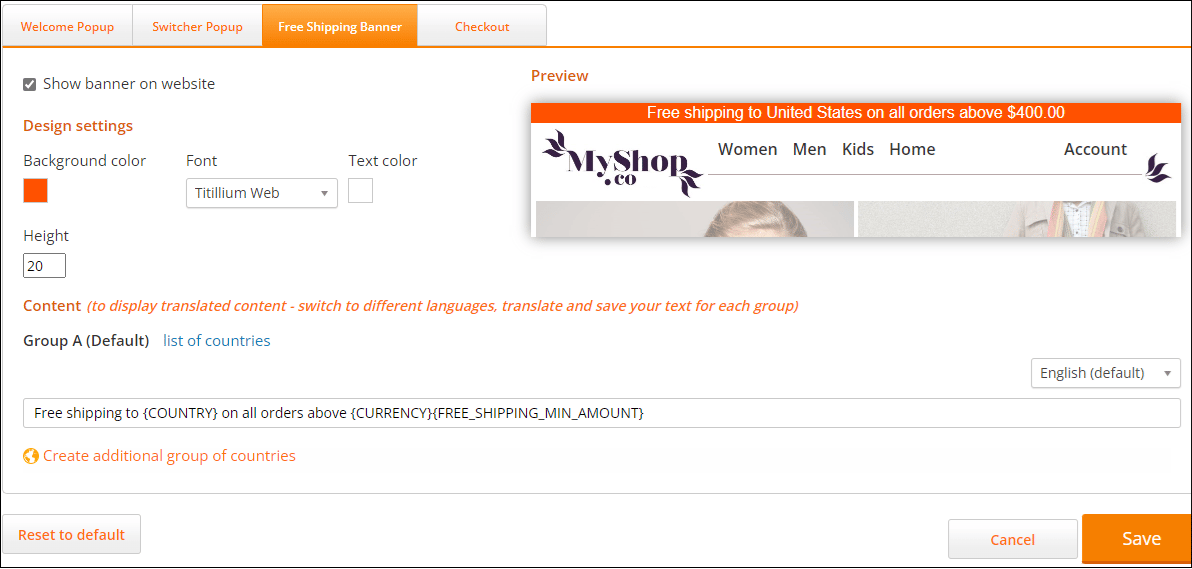
- Follow steps 1 and 2 in Accessing the Customisation Page.
- Click Free Shipping Banner.
- Click Show banner on website.
- Modify the Design settings section as needed.
-
Modify your list of countries (optional):
- Click list of countries.
- Select all of the relevant countries.
- Click OK.
- Select a language from the language menu on the far right of the page.
-
Enter the text of your shipping banner message in the text field.
The text in the curly brackets pulls information from the database.
-
Create an additional group of countries (optional):
- Click Create additional group of countries.
- Select a continent from the map.
- Select your countries from the Create a new group of countries panel.
- Click OK.
- Click Save.