> ## Documentation Index
> Fetch the complete documentation index at: https://nce-docs.bglobale.com/llms.txt
> Use this file to discover all available pages before exploring further.
# Updating Exchange Options
Updating exchange options includes the following setting types:
* Manual Exchange
* Variant Exchange
## Overview
You can update your exchange experience by editing exchange resolutions in the **Admin Dashboard** and then applying them in your return policy rules. This lets you offer customers one or both of the following:
* **Manual Exchange** (reviewed and handled by your customer service team)
* **Variant Exchange** (in-portal size/color exchange for the same product)
You can also control variant exchange pricing rules, stock behavior, and how exchange-order shipping rates are applied.
## Objectives
By the end of this guide, you will be able to:
* Add **Manual Exchange** resolution
* Update **Variant Exchange** resolution.
* Configure variant exchange pricing, stock, and shipping behaviors.
* Update exchange-related settings in **General** (price source, returning exchanged items, and location-based inventory rules).
* Apply exchange resolutions in **Return Policy**rules and verify they appear in your return portal.
## Prerequisites
Verify that you have access to the Admin Dashboard with permission to edit **Settings**.
## Adding a Manual Exchange Resolution
Manual exchange enables customers to submit an exchange request that your team handles manually (including creating the new exchange order manually).
1. Navigate to *Settings > Resolutions*.
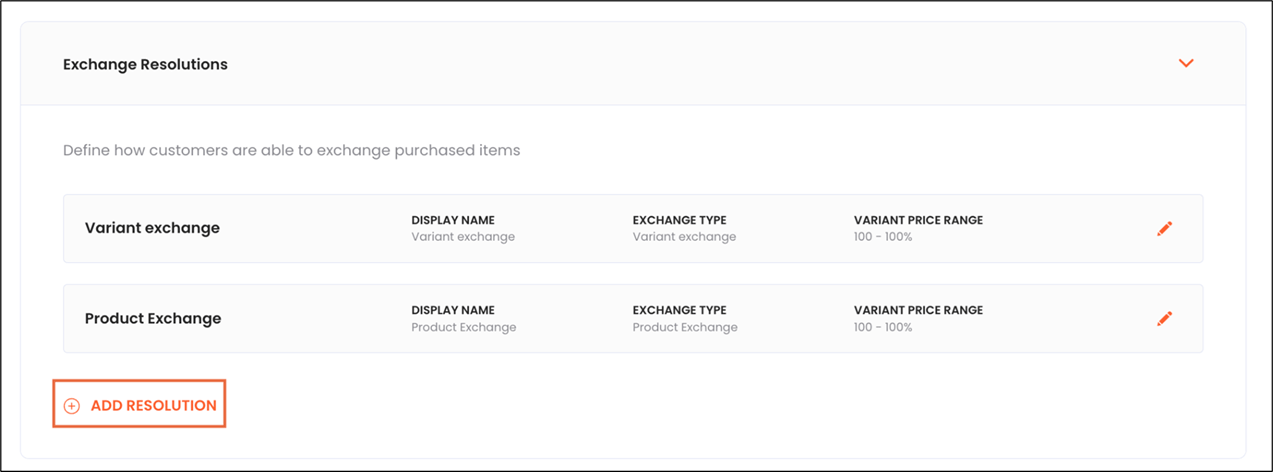
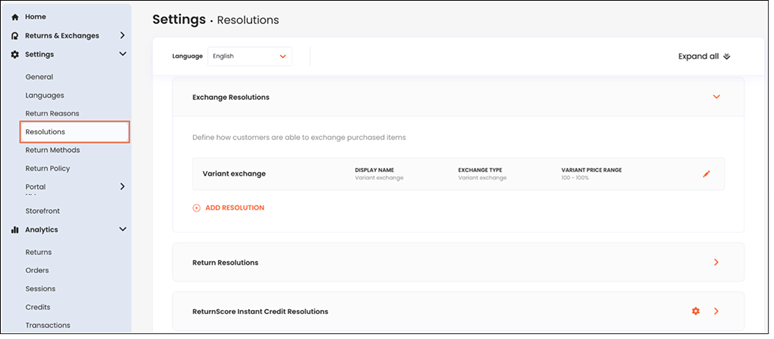 2. In **Exchange Resolutions**, click **ADD RESOLUTION**.
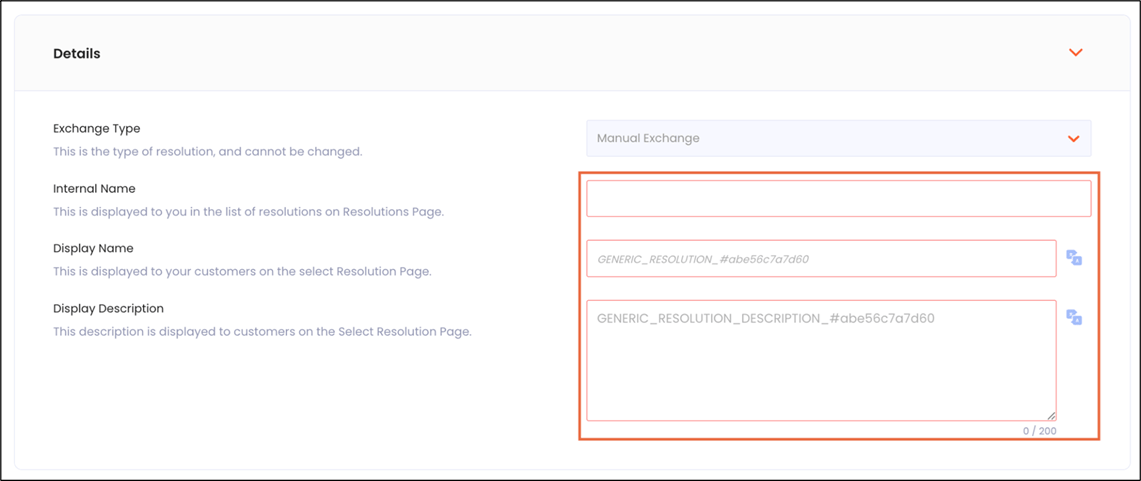
 3. In **Details**, update the following fields:
* **Internal Name** (not shown to customers)
* **Display Name** (shown in the return portal)
* **Display Description** (shown in the returns portal)
3. In **Details**, update the following fields:
* **Internal Name** (not shown to customers)
* **Display Name** (shown in the return portal)
* **Display Description** (shown in the returns portal)
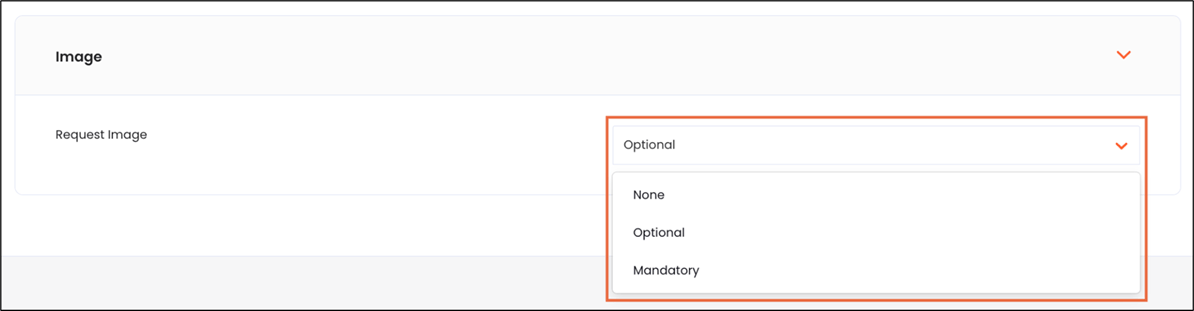
 4. In **Image**, select whether the customer can attach an image:
* None (customers cannot add images)
* Optional (customers can add images)
* Mandatory (an RMA cannot be created without an image)
4. In **Image**, select whether the customer can attach an image:
* None (customers cannot add images)
* Optional (customers can add images)
* Mandatory (an RMA cannot be created without an image)
 5. Click the **save icon** in the top right corner.
6. In the Returns portal, confirm that the manual exchange option is displayed (when eligible) via policy rules.
## Updating Your Variant Exchange Resolution
Variant exchange enables customers to exchange an item for a different variant of the same product (for example, size or color).
### Opening the Variant Exchange Resolution for Editing
1. Navigate to *Settings > Resolutions*.
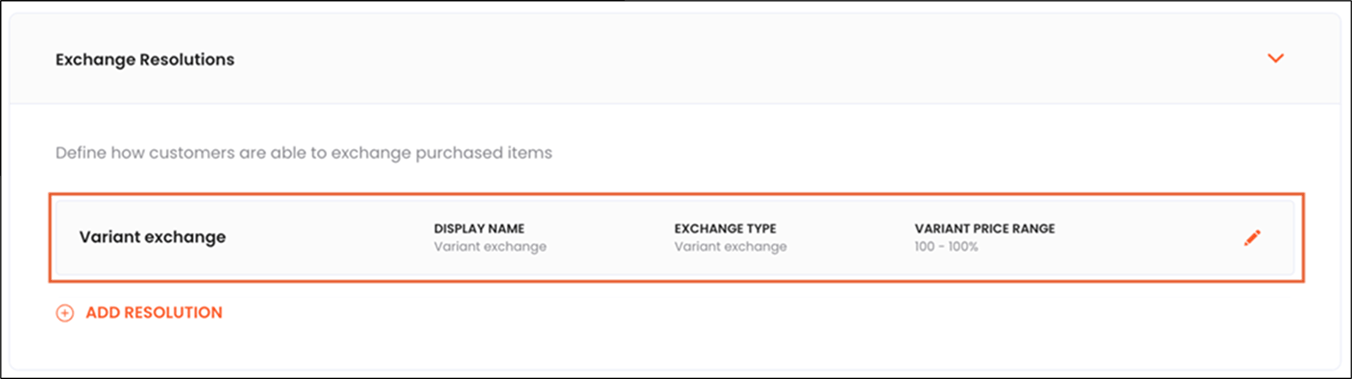
2. In **Exchange Resolutions**, open an existing variant exchange resolution (or create a new one if available in your dashboard).
5. Click the **save icon** in the top right corner.
6. In the Returns portal, confirm that the manual exchange option is displayed (when eligible) via policy rules.
## Updating Your Variant Exchange Resolution
Variant exchange enables customers to exchange an item for a different variant of the same product (for example, size or color).
### Opening the Variant Exchange Resolution for Editing
1. Navigate to *Settings > Resolutions*.
2. In **Exchange Resolutions**, open an existing variant exchange resolution (or create a new one if available in your dashboard).
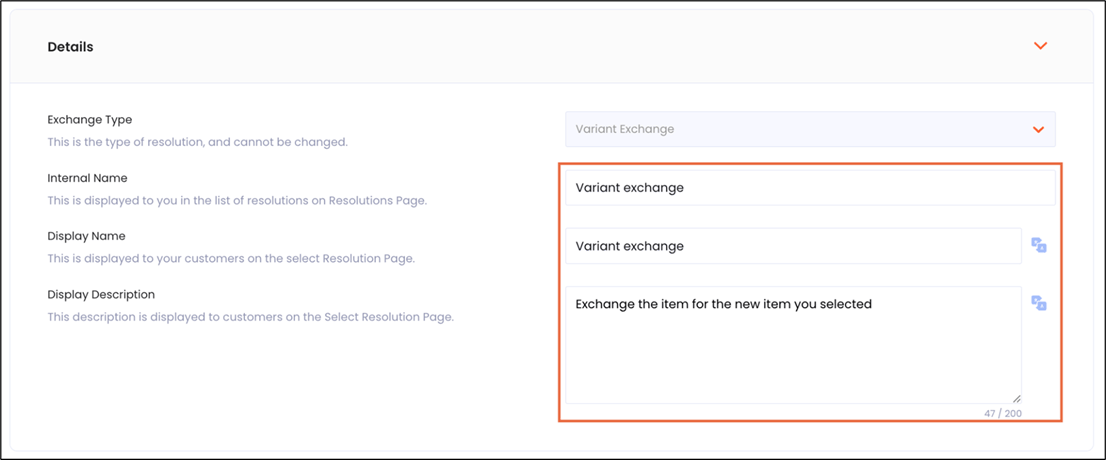
 3. In **Details**, update:
* **Internal Name** (internal only)
* **Display Name** (shown in the return portal)
* **Display Description** (shown in the returns portal)
3. In **Details**, update:
* **Internal Name** (internal only)
* **Display Name** (shown in the return portal)
* **Display Description** (shown in the returns portal)
 ### Configuring Pricing
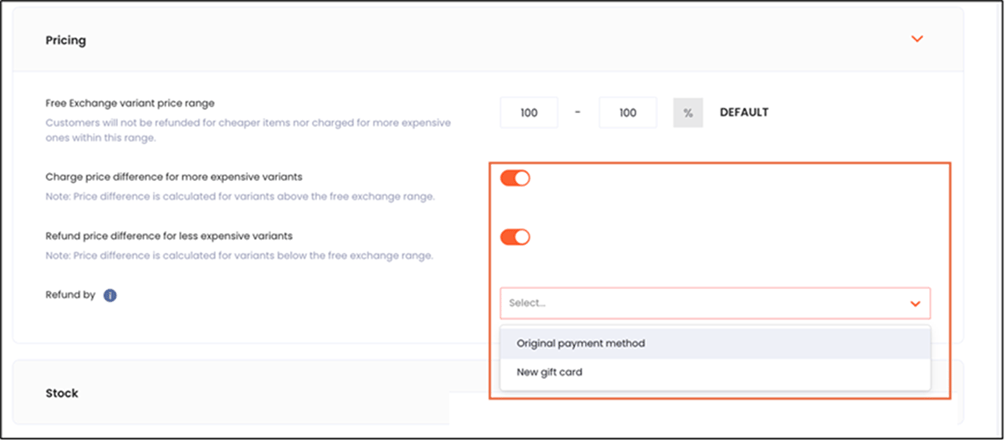
Configuring pricing is calculated as the sum of the**free range**and **price difference behavior**.
1. In **Pricing**, set the **Free exchange variant price range**.
### Configuring Pricing
Configuring pricing is calculated as the sum of the**free range**and **price difference behavior**.
1. In **Pricing**, set the **Free exchange variant price range**.
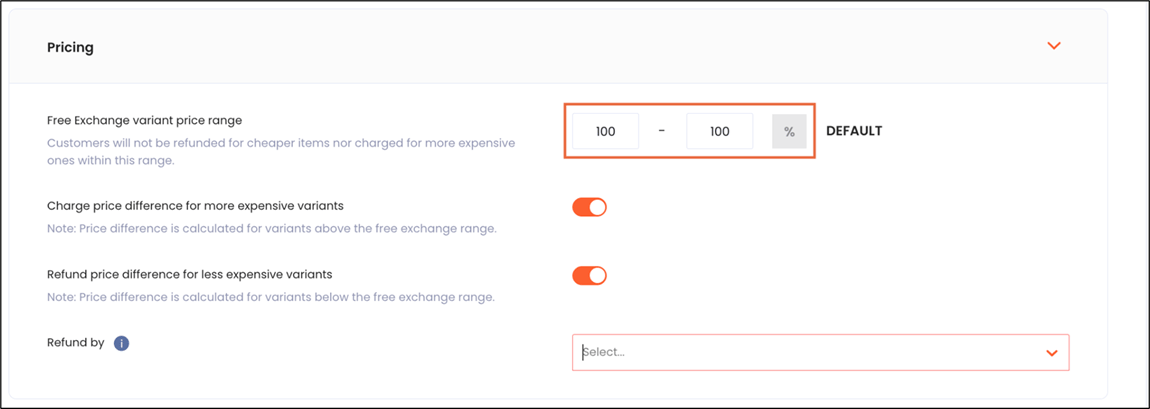 2. Do one or all of the following:
* Enable **Charge price difference** for more expensive variants.
* Enable **Refund price difference** for less expensive variants.
* Select the **Refund method** (for price differences).
2. Do one or all of the following:
* Enable **Charge price difference** for more expensive variants.
* Enable **Refund price difference** for less expensive variants.
* Select the **Refund method** (for price differences).
 3. Click the **save icon** in the top right corner of the page.
### Configuring Stock Behavior
Configuring stock behavior is calculated as the sum of **out-of-stock**, **threshold**, and **size chart**.
1. Navigate to *Settings > Resolutions*:
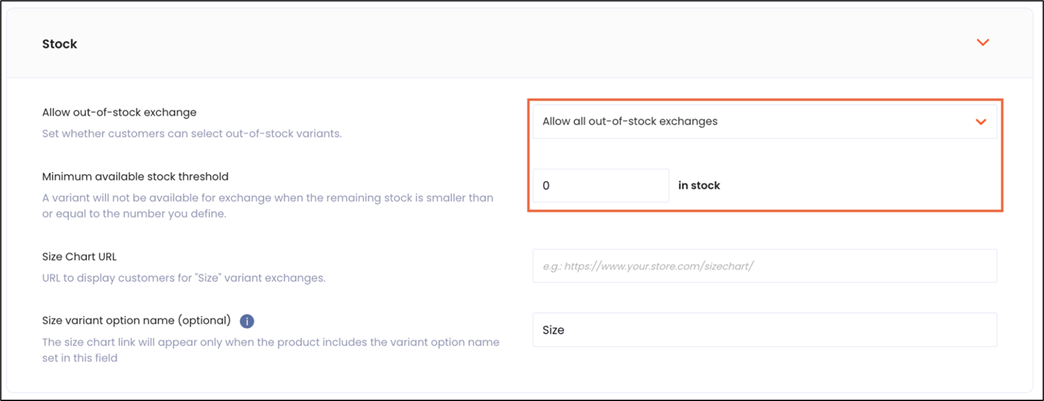
2. In **Stock**:
1. In the **Allow out-of-stock exchange** menu, select **Allow all out-of-stock exchanges**.
2. Set **Minimum available stock threshold**.
3. Click the **save icon** in the top right corner of the page.
### Configuring Stock Behavior
Configuring stock behavior is calculated as the sum of **out-of-stock**, **threshold**, and **size chart**.
1. Navigate to *Settings > Resolutions*:
2. In **Stock**:
1. In the **Allow out-of-stock exchange** menu, select **Allow all out-of-stock exchanges**.
2. Set **Minimum available stock threshold**.
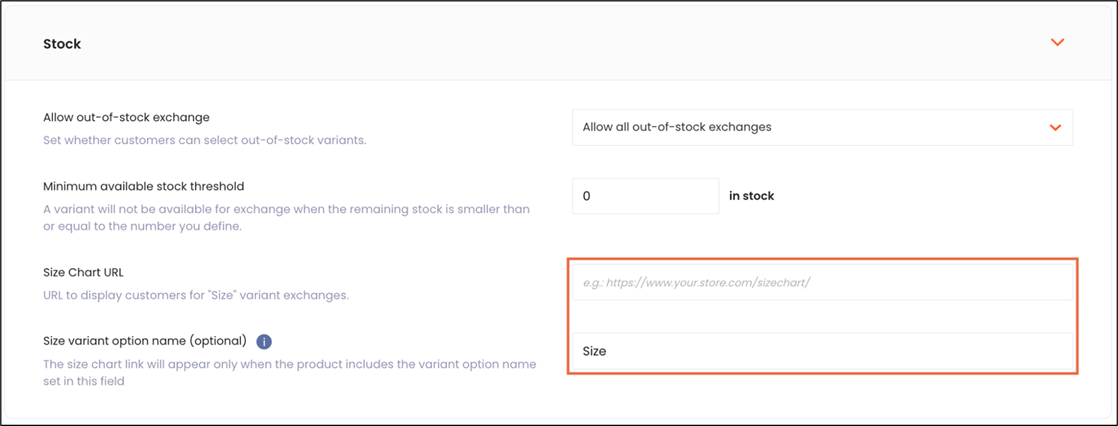
 3. (Optional) Add size chart support:
1. Add the size chart URL.
2. Add the size variant option name (so the size chart shows only for that option type).
3. (Optional) Add size chart support:
1. Add the size chart URL.
2. Add the size variant option name (so the size chart shows only for that option type).
 4. Click the **save icon** in the top right corner of the page.
### Configuring Exchange-Order Shipping
This section describes how to configure exchange-order shipping.
1. Navigate to Settings > Resolutions.
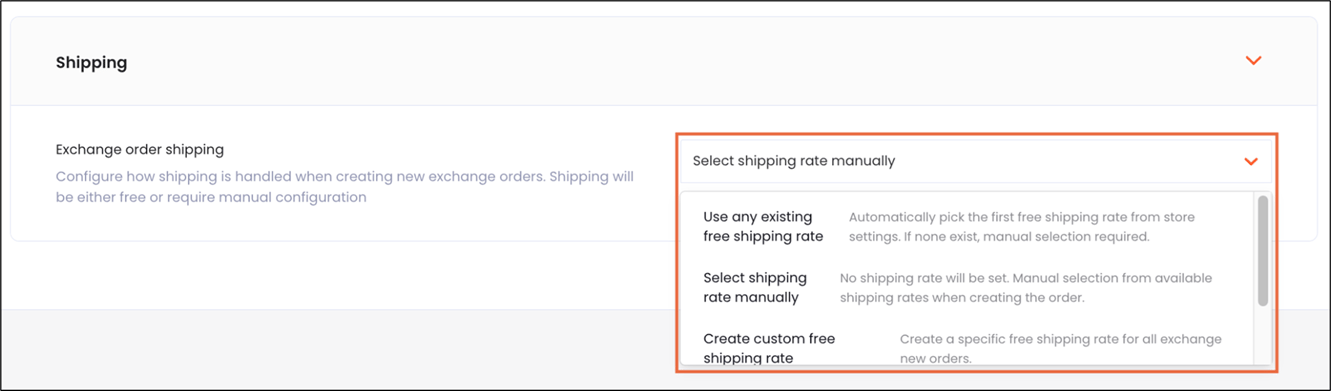
2. Expand the **Shipping** section, and choose how shipping rates are applied to exchange orders:
* Use any existing free shipping rate
* Select shipping rate manually
* Create custom free shipping rate
* Always use one selected shipping rate
4. Click the **save icon** in the top right corner of the page.
### Configuring Exchange-Order Shipping
This section describes how to configure exchange-order shipping.
1. Navigate to Settings > Resolutions.
2. Expand the **Shipping** section, and choose how shipping rates are applied to exchange orders:
* Use any existing free shipping rate
* Select shipping rate manually
* Create custom free shipping rate
* Always use one selected shipping rate
 3. In the top right corner, click the **save icon**.
The Exchange order shipping setting does not currently apply to manual exchanges.
### Setting the Reference Price for Exchange Price Differences
1. Navigate to *Settings > General*.
2. Open the **Exchanges** section.
3. Under **Product Exchange**, set **Original Item’s Price Source**:
* Paid Price
* Catalog Price at Time of RMA
* Catalog Price at Time of Purchase
4. Click the **save icon** in the top right corner of the page.
The Exchange order shipping setting does not currently apply to manual exchanges.
### Allowing Previously Exchanged Items to be Returned
1. Navigate to *Settings > General*.
2. Open **Exchanges**.
3. Enable **Allow Exchanged Items to be Returned**.
4. In the top right corner, click the **save icon**.
### Fulfilling Exchanges Based on Order Country
1. Navigate to *Settings > General*.
2. Open **Exchanges**.
3. Enable **Fulfill Exchanges Based on Order Country**.
4. In the top right corner, click the **save icon**.
## Updating General Exchange Settings
Updating exchange settings in General refers to the price source + exchanged-item returns + location logic.
### Allowing Previously Exchanged Items to be Returned
1. Go to *Settings > General*.
2. Open **Exchanges**.
3. Enable **Allow Exchanged Items to be Returned**.
4. In the top right corner, click the **save icon** in the top right corner of the page.
### Fulfilling Exchanges Based on Order Country
1. Go to *Settings > General*.
2. Open **Exchanges**.
3. Enable **Fulfill Exchanges Based on Order Country**.
4. Click the **save icon** in the top right corner of the page.
## Applying Exchange Resolutions in Your Return Policy Rules
Resolutions appear to customers only when they’re eligible via your return policy rules.
1. Navigate to *Settings > Return Policy*.
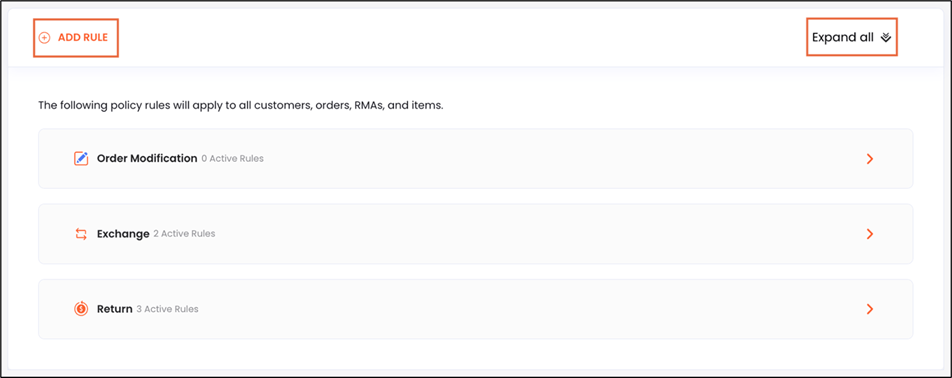
2. Update a rule:
* Click **ADD RULE** to create a new rule, or
* Click **EXPAND ALL** to edit existing rules.
3. In the top right corner, click the **save icon**.
The Exchange order shipping setting does not currently apply to manual exchanges.
### Setting the Reference Price for Exchange Price Differences
1. Navigate to *Settings > General*.
2. Open the **Exchanges** section.
3. Under **Product Exchange**, set **Original Item’s Price Source**:
* Paid Price
* Catalog Price at Time of RMA
* Catalog Price at Time of Purchase
4. Click the **save icon** in the top right corner of the page.
The Exchange order shipping setting does not currently apply to manual exchanges.
### Allowing Previously Exchanged Items to be Returned
1. Navigate to *Settings > General*.
2. Open **Exchanges**.
3. Enable **Allow Exchanged Items to be Returned**.
4. In the top right corner, click the **save icon**.
### Fulfilling Exchanges Based on Order Country
1. Navigate to *Settings > General*.
2. Open **Exchanges**.
3. Enable **Fulfill Exchanges Based on Order Country**.
4. In the top right corner, click the **save icon**.
## Updating General Exchange Settings
Updating exchange settings in General refers to the price source + exchanged-item returns + location logic.
### Allowing Previously Exchanged Items to be Returned
1. Go to *Settings > General*.
2. Open **Exchanges**.
3. Enable **Allow Exchanged Items to be Returned**.
4. In the top right corner, click the **save icon** in the top right corner of the page.
### Fulfilling Exchanges Based on Order Country
1. Go to *Settings > General*.
2. Open **Exchanges**.
3. Enable **Fulfill Exchanges Based on Order Country**.
4. Click the **save icon** in the top right corner of the page.
## Applying Exchange Resolutions in Your Return Policy Rules
Resolutions appear to customers only when they’re eligible via your return policy rules.
1. Navigate to *Settings > Return Policy*.
2. Update a rule:
* Click **ADD RULE** to create a new rule, or
* Click **EXPAND ALL** to edit existing rules.
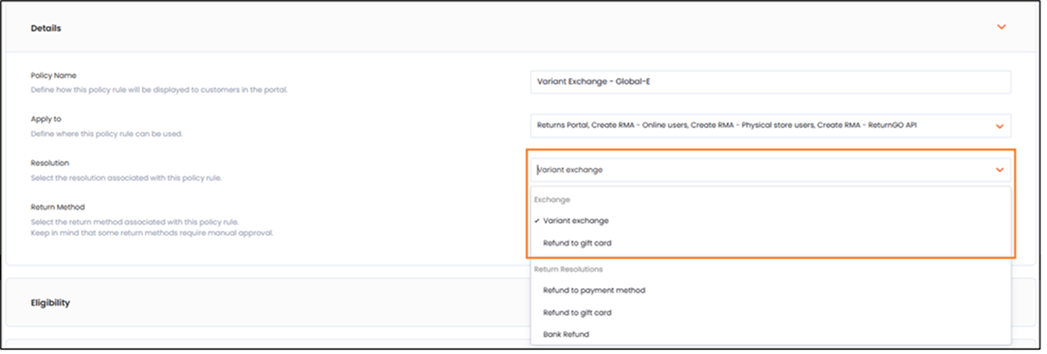
 3. In the rule’s **Details** section, select the relevant **Resolution** (for example, **Manual Exchange** or **Variant Exchange**).
 4. At the top of the page, enable **Activate Policy Rule**.
5. Click the **save icon** at the top right corner of the page.
## Verifying Exchange Processing on the RMA
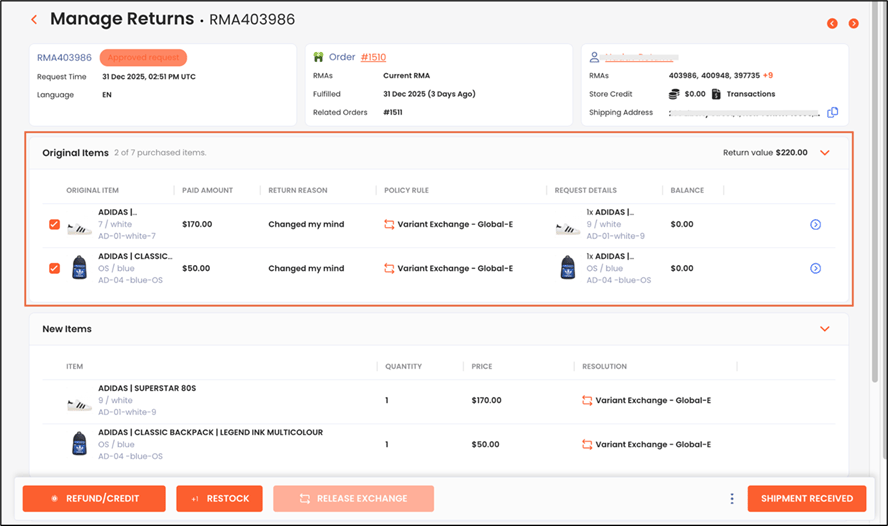
1. Navigate to *Manage Returns*.
2. Open a relevant RMA.
3. Confirm you can review the exchange request details and proceed with your internal fulfillment workflow.
4. At the top of the page, enable **Activate Policy Rule**.
5. Click the **save icon** at the top right corner of the page.
## Verifying Exchange Processing on the RMA
1. Navigate to *Manage Returns*.
2. Open a relevant RMA.
3. Confirm you can review the exchange request details and proceed with your internal fulfillment workflow.