> ## Documentation Index
> Fetch the complete documentation index at: https://nce-docs.bglobale.com/llms.txt
> Use this file to discover all available pages before exploring further.
# Configuring Automation Rules for Returns
## Overview
**Automation rules** in the Admin Dashboard gives you automated control over the return life cycle. Configuring automation per policy rule lets you automatically approve RMAs, issue refunds, and mark RMAs as done, while keeping exceptions available for manual review.
## Objectives
By the end of this guide, you will be able to:
* Update a policy rule to use automated approval, refunds, and completion.
* Configure automation triggers and delays (when available).
* Enable item validation workflows for warehouse teams where required.
* Verify that automations executed successfully (and troubleshoot common blockers).
## Prerequisites
* You have access to the **Admin Dashboard** with permission to edit **Settings**(policy rules and store settings).
* Your store is connected to **Shopify**.
## Accessing Your Policy Rules
Because Global-e configures automation per policy rule, you can combine manual and automatic processing across different scenarios.
1. Navigate to to *Settings > Return Policy*.
2. The **Settings – Return Policy** page is displayed.
3. On the right side of the screen, click **Expand all**.
4. Click the **pencil**icon located to the right of the policy rule you want to update.
5. The selected policy rule’s details are displayed.
6. Expand the **RMA Handling Process** section.
7. Do one or more of the following:
* [Configure Auto-Approval](/configuring-automation-rules-for-returns#configuring-auto-approvals-476693)
* [Configure Auto-Refund](/configuring-automation-rules-for-returns#configuring-auto-refund)
* [Set Auto-Mark as Done](/configuring-automation-rules-for-returns#setting-auto-mark-as-done-476693)
* [Set Mark as Done after Partial Validation](/configuring-automation-rules-for-returns#setting-mark-as-done-after-partial-validation-476693)
* [Enable item validation](/configuring-automation-rules-for-returns#enabling-item-validation-for-warehouse-workflows-476693)
* [Validate items](/configuring-automation-rules-for-returns#validating-items-476693)
* [Verify and monitor your automation results](/configuring-automation-rules-for-returns#verifying-and-monitoring-automation-results-476693)
## Configuring Auto-Approvals
Auto-approvals automatically approve RMAs that meet policy rule criteria.
1. Complete [accessing your policy rules](/configuring-automation-rules-for-returns#accessing-your-policy-rules-476693).
2. In the dropdown menu located to the right of**Approval Process**, select **Automatic**.
3. Click the **save**icon in the top right corner.
The save icon is only displayed when you change your **Approval Process** selection.
1. Navigate to *Returns & Exchanges*.The **Manage Returns** window is displayed.
2. Click an RMA that matches the conditions in the policy rule.
3. Confirm the RMA is showing as **Approved**, and does not remain in **Pending Requests**.
## Configuring Auto-Refund
Auto-refund issues refunds based on events (immediate or delayed) you select, and is configured per policy rule.
1. Complete [accessing your policy rules](/configuring-automation-rules-for-returns#accessing-your-policy-rules-476693).
2. In the dropdown menu located to the right of **Refund Process**, select **Automatic**.The **Trigger**and **Execute** dropdown menus are displayed.
3. Set the **Trigger** event:
* RMA is approved
* Shipment is in transit
* Shipment has been received
* Items have been validated
The available trigger options vary according to trigger selection and account. For example, selecting **Items have been validated** displays the **Validation**dropdown menu
4. In the **Execute** field, select one of the following:
* Immediately
* After…
5. Do one of the following:
* If you selected Immediately, skip to **Step 6**.
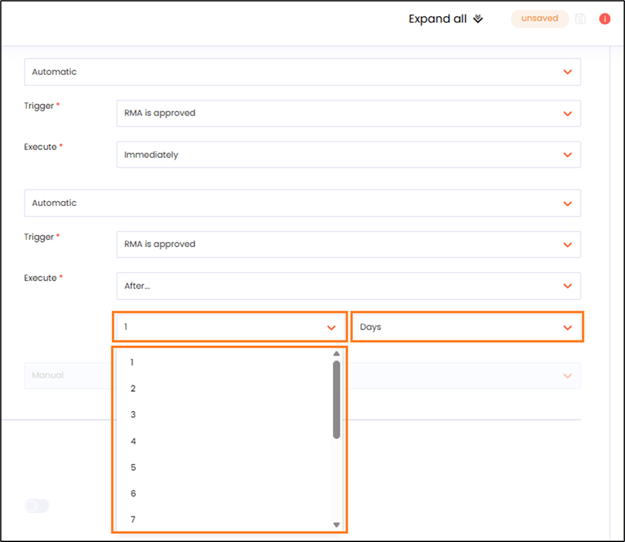
* If you selected **After…**, set the following, as shown in the figure below:
* Number value
* Time unit
 6. Click the **save**icon located in the top right corner of the page.
The **save**icon is only displayed when you change your **Approval Process** selection.
## Setting Auto-Mark as Done
Auto-mark as done marks an RMA as **Done**when all customer requests in the RMA are fulfilled.
1. Complete [accessing your policy rules](/configuring-automation-rules-for-returns#accessing-your-policy-rules-476693).
2. Set **Mark as Done** to **Automatic**.
3. Click the **save**icon located in the top right corner of the page.
The save icon is only displayed when you change your **Approval Process** selection.
4. Verify that the auto-approval update worked:
1. Navigate to *Returns and Exchanges*.
2. Search or filter for an RMA processed under the policy rule in**Step**6 of **Configuring Auto-Approvals**.
3. Verify that the RMA status has changed to **Done automatically when conditions are met.**
## Setting Mark as Done After Partial Validation
Setting **Mark as Done After Partial Validation** is an optional configuration that marks RMAs as Done after actions are completed, even if some items are negatively validated. This feature is activated only when all items have a validation status.
This feature is limited to merchants with certain subscription plans.
1. Complete [accessing your policy rules](/configuring-automation-rules-for-returns#accessing-your-policy-rules-476693).
2. Set **Mark as Done** to **Automatic**.
3. Select **Mark as Done After Partial Validation**.
4. Click the **save** icon located in the top right corner of the page.
The **save**icon is only displayed when you change your **Approval Process** selection.
## Enabling Item Validation for Warehouse Workflows
Item validation is an optional configuration. It supports automations that trigger on validation and is used for certain workflows, such as restocking.
1. Navigate to *Settings > General*.
2. Scroll down to near the bottom of the page and expand **Items Validation**.
3. Select the **Document Shipment Content Inspection**.
4. Click the **save**icon in the top right corner.
The **save**icon is only displayed when you change your **Approval Process** selection.
## Validating Items
Validating items is only relevant for operations or the warehouse.
1. Navigate to *Returns and Exchanges*.
2. Search or filter for an RMA processed under the policy rule in **Step 6** of **Configuring Auto-Approvals**.
3. In the **Item Validation** region, set a status per item:
* Returned
* Returned + Restockable
* Not Returned
4. Click **save**in the top right corner of the page.
## Verifying and Monitoring Automation Results
Once you’ve set your configurations as needed, you can use the checks described in this section to verify and monitor your automation results.
1. Navigate to *Returns and Exchanges.*
2. Filter RMAs by status to confirm workflow status, such as:
* Pending Requests
* Requires Attention
* Shipment Received
* Done
* Canceled Requests
3. Open an RMA.
4. Review the **Timeline**section for automation events, such as approval, refund, or completion.
If an RMA is stuck in the **Requires Attention**stage, verify that the automation trigger conditions were met, especially for validation-based automations.
6. Click the **save**icon located in the top right corner of the page.
The **save**icon is only displayed when you change your **Approval Process** selection.
## Setting Auto-Mark as Done
Auto-mark as done marks an RMA as **Done**when all customer requests in the RMA are fulfilled.
1. Complete [accessing your policy rules](/configuring-automation-rules-for-returns#accessing-your-policy-rules-476693).
2. Set **Mark as Done** to **Automatic**.
3. Click the **save**icon located in the top right corner of the page.
The save icon is only displayed when you change your **Approval Process** selection.
4. Verify that the auto-approval update worked:
1. Navigate to *Returns and Exchanges*.
2. Search or filter for an RMA processed under the policy rule in**Step**6 of **Configuring Auto-Approvals**.
3. Verify that the RMA status has changed to **Done automatically when conditions are met.**
## Setting Mark as Done After Partial Validation
Setting **Mark as Done After Partial Validation** is an optional configuration that marks RMAs as Done after actions are completed, even if some items are negatively validated. This feature is activated only when all items have a validation status.
This feature is limited to merchants with certain subscription plans.
1. Complete [accessing your policy rules](/configuring-automation-rules-for-returns#accessing-your-policy-rules-476693).
2. Set **Mark as Done** to **Automatic**.
3. Select **Mark as Done After Partial Validation**.
4. Click the **save** icon located in the top right corner of the page.
The **save**icon is only displayed when you change your **Approval Process** selection.
## Enabling Item Validation for Warehouse Workflows
Item validation is an optional configuration. It supports automations that trigger on validation and is used for certain workflows, such as restocking.
1. Navigate to *Settings > General*.
2. Scroll down to near the bottom of the page and expand **Items Validation**.
3. Select the **Document Shipment Content Inspection**.
4. Click the **save**icon in the top right corner.
The **save**icon is only displayed when you change your **Approval Process** selection.
## Validating Items
Validating items is only relevant for operations or the warehouse.
1. Navigate to *Returns and Exchanges*.
2. Search or filter for an RMA processed under the policy rule in **Step 6** of **Configuring Auto-Approvals**.
3. In the **Item Validation** region, set a status per item:
* Returned
* Returned + Restockable
* Not Returned
4. Click **save**in the top right corner of the page.
## Verifying and Monitoring Automation Results
Once you’ve set your configurations as needed, you can use the checks described in this section to verify and monitor your automation results.
1. Navigate to *Returns and Exchanges.*
2. Filter RMAs by status to confirm workflow status, such as:
* Pending Requests
* Requires Attention
* Shipment Received
* Done
* Canceled Requests
3. Open an RMA.
4. Review the **Timeline**section for automation events, such as approval, refund, or completion.
If an RMA is stuck in the **Requires Attention**stage, verify that the automation trigger conditions were met, especially for validation-based automations.