> ## Documentation Index
> Fetch the complete documentation index at: https://nce-docs.bglobale.com/llms.txt
> Use this file to discover all available pages before exploring further.
# Configuring and Managing Returns Reasons in the Portal
## Overview
Use the **Admin Dashboard** home page and the **Manage Returns** page to monitor and process return and exchange requests (RMAs). The home page highlights what needs action, and Manage Returns is the main workspace for searching, filtering, reviewing, and completing RMA workflows.
**Manage Your Returns** shows your status counts and shortcuts, while **Return Portal** includes a link to your live Return portal.
Your layout may differ depending on your settings.
## Objectives
By the end of this guide, you will be able to:
* Use the home page to jump to key return queues.
* Search, sort, and filter RMAs by status in Manage Returns.
* Review an RMA and complete common actions (approve, reject, cancel, reopen, receive, done).
* Validate, restock, and refund/credit.
* Export a returns data report and find RMAs that require attention.
## Prerequisites
Access to the Admin Dashboard with permission to manage RMAs.
## Understanding the Home Screen
The Home screen is divided into sections that classify returns at different status, each representing a stage in the return life cycle. These sections are located in the **Manage Your Returns** section. In addition, the **Return Portal** section on this page shows your Returns Portal URL, which you can add to your store or share with customers.
The following figure shows the **Home** screen:
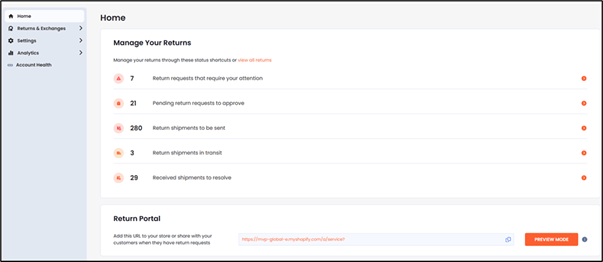 From here you can view:
* Return requests that require your attention
* Pending return requests to approve
* Return shipments to be sent
* Return shipments in transit
* Received shipments to resolve
You can expand each group by clicking the one you want to expand. Each row corresponds to a group. Each group shows a number, indicating the amount of items on that page.
Clicking a group expands on a different page.
## Managing Returns
In the Home screen description, we mentioned that you can view returns at different stages of the return life cycle. When you click one of the life cycle groups mentioned earlier, you can view the requests across the entire return life cycle.
1. From the Home screen, click one of the following:
* Return requests that require your attention
* Pending return requests to approve
* Return shipments to be sent
* Return shipments in transit
* Received shipments to resolve
2. In the top row, click one of the following status filters:
| All
From here you can view:
* Return requests that require your attention
* Pending return requests to approve
* Return shipments to be sent
* Return shipments in transit
* Received shipments to resolve
You can expand each group by clicking the one you want to expand. Each row corresponds to a group. Each group shows a number, indicating the amount of items on that page.
Clicking a group expands on a different page.
## Managing Returns
In the Home screen description, we mentioned that you can view returns at different stages of the return life cycle. When you click one of the life cycle groups mentioned earlier, you can view the requests across the entire return life cycle.
1. From the Home screen, click one of the following:
* Return requests that require your attention
* Pending return requests to approve
* Return shipments to be sent
* Return shipments in transit
* Received shipments to resolve
2. In the top row, click one of the following status filters:
| All
Open RMAs
Pending requests
Approved requests
In transit
Shipment received | Done
Rejected requests
Canceled requests
Shipment rejected
Require attention |
| ------------------------------------------------------------------------------------------------------ | ------------------------------------------------------------------------------------------------ |
RMAs that require attention pause processing until you resolve the issue. Hovering over an RMA number that requires attention shows a prompt providing the reason that it requires attention.
## Searching for an RMA
1. Navigate to *Returns & Exchanges > Manage Returns*.
2. In the **Search RMA or order number** text field, type an RMA number, order number, or customer ID.
3. Optional:
* Disable **Exact match** to search by partial number.
* Enable **Exact match** to search by full number only.
4. Click the **search** Search.png *button*.
## Sorting and Filtering RMAs
1. Navigate to *Returns & Exchanges > Manage Returns*.
2. Click **SETTINGS**.
3. From the **Date Column** menu, select one:
* RMA created
* Shipment delivered
* Shipment in-transit
4. Click **SAVE**.
5. Filter RMAs using any of the following:
* Date Created (Select a start and end date, and click **Apply**to apply your date range)
* Resolutions (exchange, return resolutions, other)
* Return reason
* Resolutions (exchange, return resolutions, other)
* Reserved Item Expiration (All / By Date Range / By Days Remaining / Expired Reservations), requires item reservation
* Refund/Payment Status (All / Not Refunded / Not Paid / Paid / Expiring/Expired Payments)
6. Click **APPLY**.
## Viewing RMA Details
1. Search for an RMA.
2. From the search results, click an RMA number.
From here you can view:
* RMA summary and order summary
* Customer information
* Original items and new items (if applicable)
* Shipments and draft orders
* Timeline
* Bottom action bar (actions change by status)
## Approving a Return Request
1. Open the relevant RMA.
2. Review the request details.
3. Click **APPROVE** in the bottom action bar.
## Rejecting a Return Request
1. Open the relevant RMA.
2. Click **REJECT**.
3. Enter a rejection reason.
4. Click **SUBMIT**.
## Canceling an RMA
1. Open the relevant RMA.
2. Click **CANCEL**.
3. Confirm the cancellation.
## Reopening a Canceled RMA
1. Open the canceled RMA.
2. Click **REOPEN**.
## Issuing a Refund or Credit
1. Open the relevant RMA.
2. Click **REFUND/CREDIT**.
3. Review the refund calculator.
4. Click **APPLY**.
5. Select the refund method.
6. Click **SUBMIT**.
## Exporting a Returns Data Report
1. Navigate to *Returns & Exchanges > Manage Returns*.
2. Click **EXPORT**.
3. Select the desired export format and filters.
4. Click **DOWNLOAD**.